Choose an inspection camera UK buyer can use at the bench

Product feature overview

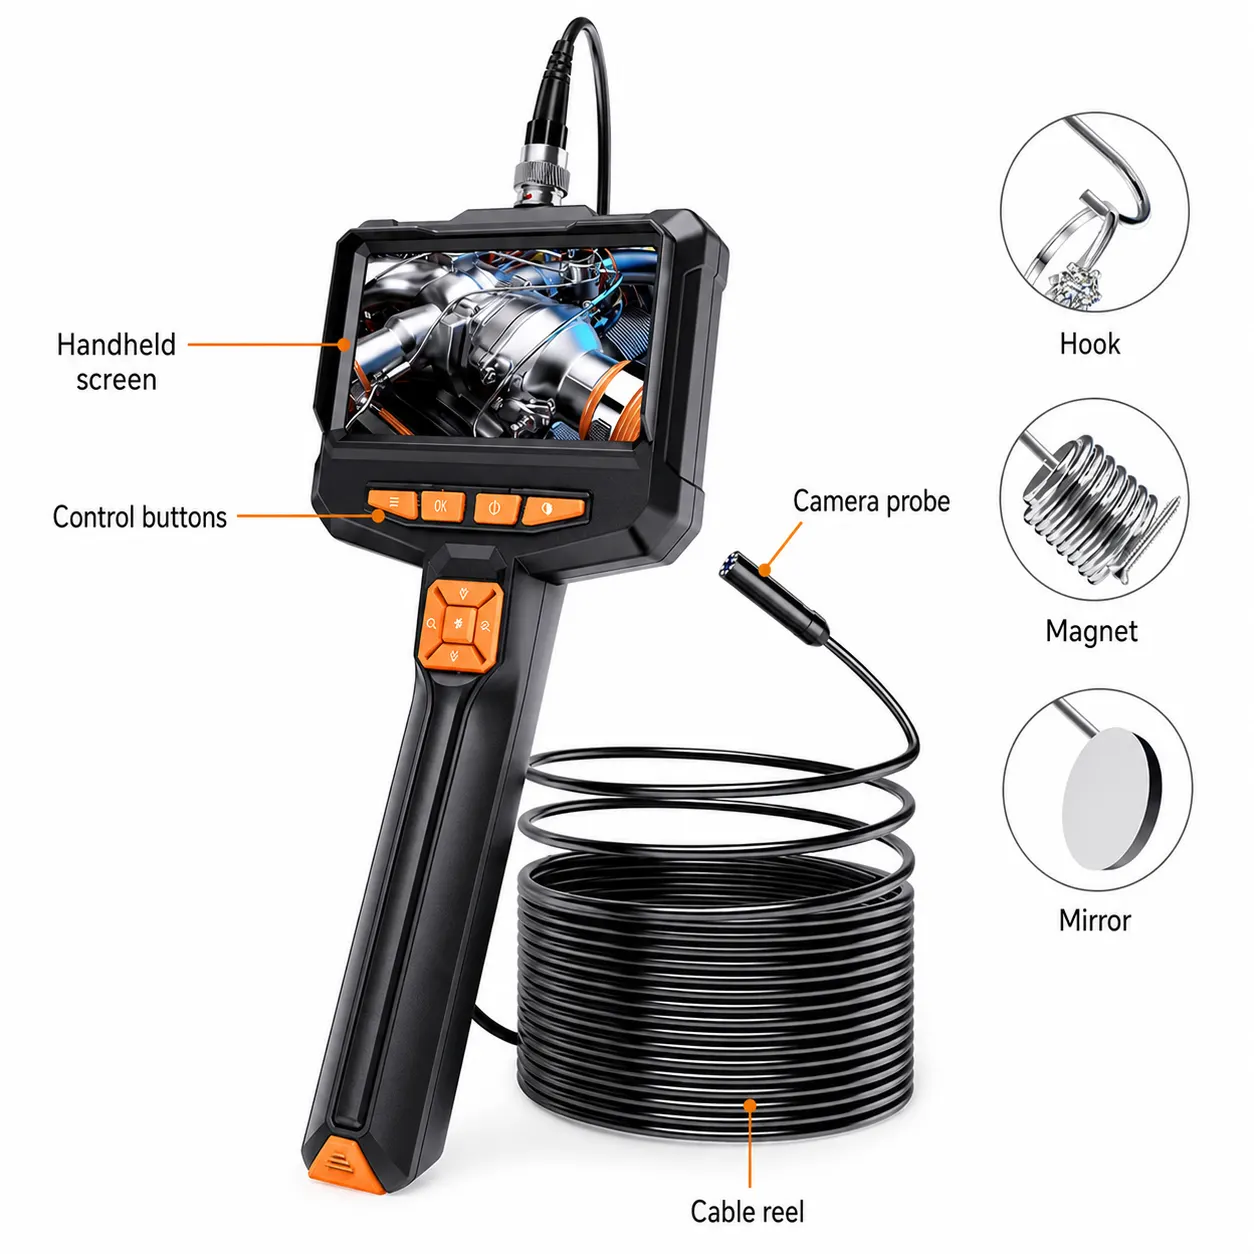
For an inspection camera UK buyer, the practical first step is to measure the access point, check the working distance and confirm whether the camera needs to cope with darkness or moisture. The listed 5M Endoscope Inspection Camera has a 7.9mm lens, a 5-metre semi-rigid cable, eight adjustable LEDs, a 4.3-inch IPS colour screen and a stated IP67 waterproof rating. That makes it worth considering for a workshop, garage or maintenance bench where the task involves viewing inside a narrow or poorly lit space. It is not a universal answer: the opening, cable route, environment and required records still need checking.

The right buyer is someone who wants a self-contained handheld viewer rather than a phone-dependent setup. The listing says this model works without WiFi, an app or a smartphone, and offers up to four hours of use from a USB charge. Before choosing it, define the job in plain terms: what are you trying to see, how far inside is it, can the cable be guided without snagging, and do you need to save or share images? Those answers will tell you whether this configuration fits the work or whether you need a different type of inspection equipment.

Match the camera to a UK workshop or automotive job

At an automotive workbench, access is usually the first decision rather than screen resolution. A 7.9mm lens may suit a narrow entry point, but it will not automatically fit every cavity, tube or opening. Measure the smallest point the camera must pass through, including any bend or obstruction at the entrance. The 5-metre semi-rigid cable gives a defined amount of reach, while its bendable construction is intended to help guide it into tight spaces. A longer cable is not stated, so do not assume it can inspect beyond that distance or around every type of route.

The product listing specifically places this endoscope around cars, plumbing, electrical and HVAC checks. That is useful context, but it does not remove the need to identify the material and conditions at the inspection point. For a garage job, consider whether the camera needs to look behind a panel, into a pipe or around a component. For a maintenance bench, consider whether another person needs to watch the screen while the cable is positioned. The built-in screen means the operator does not need to provide a phone or wireless connection, which can simplify the setup at a busy bench.

Check the documented screen, lens and lighting details

The viewing arrangement is made up of a 4.3-inch IPS colour screen, a stated 1080x1920 HD resolution and a 178-degree wide-angle lens. These are the documented display and lens details to compare with your task. A screen of this size is part of the handheld unit, so check whether it is large enough for the person carrying out the inspection to identify the detail they need. The wide-angle specification may be relevant when the target is not directly in front of the lens, but it should not be treated as a guarantee that every recess will be easy to interpret.

Dark access points also need a practical check. The camera has eight adjustable LEDs, with brightness changed by pressing a button. Before buying, think about whether the work involves a clean enclosed space, a reflective metal surface, liquid or heavy debris. Lighting can help you see into a dark area, but the listing does not state how the image behaves with glare, dust, condensation or moving water. If the task depends on fine surface detail, use the documented screen, lens and light controls as your comparison points rather than assuming that a general HD description answers every image-quality question.

Check cable length, flexibility and the working environment

The cable is 5 metres long and described as semi-rigid, meaning the documented configuration is designed to bend while retaining some shape. That matters at a workshop bench because the operator can guide the camera towards a target rather than simply pushing a loose cable into the opening. Plan the route before switching on: identify the entry point, the likely bends and where the screen will rest. A cable can have enough length but still be awkward if the route turns sharply, narrows suddenly or contains an obstruction that the camera head cannot pass.

The listing gives the camera an IP67 waterproof rating and describes it for wet and rough conditions. Treat that as a product specification to check against the actual environment, not permission to use it in every wet situation. The listing does not document immersion duration, water temperature, chemical resistance, pressure resistance or suitability for hazardous areas. Keep those gaps in mind around oils, solvents, cleaning fluids, live electrical equipment and hot components. If the job involves any of those conditions, confirm the relevant requirements before relying on this particular configuration.

Know when this inspection camera does not fit the job

This model may be a mismatch where the access point is smaller than 7.9mm, where the target is more than 5 metres away, or where the route requires a cable with a different level of stiffness. It may also be the wrong choice if the operator needs a camera head with a different viewing direction, because the supplied configuration is documented with a 178-degree wide-angle lens but does not state that the lens can be remotely articulated. Measure and sketch the access route instead of judging suitability from the cable length alone.

There are also information gaps that should affect the buying decision. The supplied facts do not state storage capacity, image or video recording, computer transfer, date stamping, battery replacement or a specific control for capturing evidence. If an engineer needs to attach images to a service report, ask whether the documented setup supports that workflow before ordering. The product is described as working without WiFi, apps or a smartphone, which is useful for a standalone inspection, but it does not by itself confirm how findings can be saved or shared.

Use this inspection camera checklist at the UK bench

Start with the opening: measure the narrowest entry point and compare it with the stated 7.9mm lens. Next, measure the route: compare the distance from the operator to the inspection area with the 5-metre semi-rigid cable. Then check the surface and environment: note whether the area is dark, wet, oily, hot, dusty or exposed to chemicals, and compare those conditions with the listed eight adjustable LEDs and IP67 waterproof rating. These checks describe the physical job without assuming performance that is not documented.

Finally, check the setup and contents. Confirm that a built-in 4.3-inch IPS colour screen suits the person who will hold the unit, and decide whether up to four hours of use from a USB charge covers the planned inspection period. Confirm the box contents listed for this configuration: the endoscope camera, hook, magnet, side-view mirror, Type-C cable and manual. If the task needs recording, remote viewing, specialist protection or a different cable length, write that requirement beside the checklist and look for explicit supporting information rather than treating an accessory as proof of compatibility.

Set up an automotive or maintenance inspection in a clear sequence

A sensible sequence begins before the camera enters the work area. Identify the target and the safest access point, then check the lens diameter against the opening. Charge the unit through the supplied Type-C cable, turn on the screen and adjust the eight LEDs before pushing the cable further into the space. Keep the cable path as straight as the job allows and use the semi-rigid shape to guide it through planned bends. Stop if resistance rises rather than forcing the camera into an obstruction or tight turn.

Once the target is on screen, use the included hook, magnet or side-view mirror only when the attachment matches the task and can pass through the opening. The listing confirms those items are included, but it does not state the load they can lift, the materials they can safely contact or the angle each attachment provides. After the inspection, withdraw the cable carefully, check the lens and attachments for dirt or moisture, and follow the manual for cleaning and storage. The documented facts do not provide a detailed aftercare procedure, so the manual remains the appropriate reference.

Compare the setup with the job before committing

For a straightforward dark-space check at a garage or workshop bench, the combination of a built-in screen, adjustable LEDs, a 7.9mm lens and a 5-metre semi-rigid cable gives you clear points to compare. It avoids the need for WiFi, an app or a smartphone according to the listing, which may suit a shared work area where staff need to pick up the tool and begin. The included hook, magnet and side-view mirror may also be relevant where the inspection involves retrieving or viewing around an object, subject to the access and material checks.

For a job requiring formal image records, specialist environmental protection or a more complex camera movement, pause before treating this as the complete solution. The supplied facts do not confirm recording functions, data export, articulated movement or chemical and heat resistance. A good comparison is therefore not just screen against screen; it is lens size against opening, cable length against route, light controls against darkness, environment against the stated IP67 rating, and documented contents against the physical task. That approach helps prevent a convenient-looking tool becoming an expensive mismatch.

Take the next step with measurements and the manual

Before buying an inspection camera UK workshop teams can use confidently, write down four measurements: the smallest opening, the distance to the target, the number of bends and the expected inspection time. Add the environmental conditions and whether you need to save evidence. Compare those notes with the documented 7.9mm lens, 5-metre cable, up to four hours of use, adjustable LEDs, built-in 4.3-inch screen and listed IP67 rating. If every essential requirement has a documented match, the configuration is easier to assess on its own terms.

The final step is to check the product information and manual for anything your job depends on but the available facts do not cover, particularly image storage, cleaning, charging, attachment use and environmental limits. Do not fill those gaps with assumptions. If the task is a car, plumbing, electrical or HVAC inspection, keep the camera use separate from any work that could expose it to unsuitable heat, chemicals or electrical hazards unless the relevant instructions address them. A measured check followed by a manual check gives a practical basis for deciding whether this endoscope belongs on your UK workshop bench.